What is Sieve filtering?
At a basic level, Sieve is a system whereby the server is given rules by you to filter your email into folders. It then means that, whatever email program you use, your email is already filed away in to their correct folder according to your needs. Sieve can do more than just move email into folders.
It is helpful if you:
- UseIMAP
- Want to sort email into specific folders
Sieve Server Settings
To connect to the Manage Sieve server, use the following settings:
| Sieve Server Connection Settings | ||
|---|---|---|
| Server | imap.yourdomain.com | eg, imap.mailhostbox.com |
| Port | 4190 | |
| Username | Your email address | eg [email protected]. ie, the same as the one you use to access your email accountIMAP |
| Password | your email password | ie, the same as that you use to access your email accountIMAP |
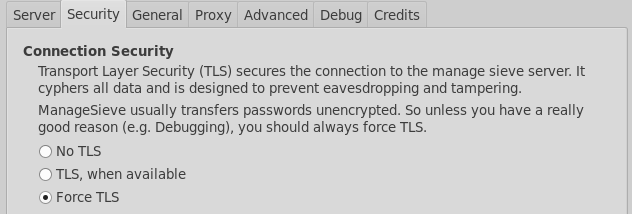
| Security | TLS | You can use TLS for a secure connection, as recommended. |

The Thunderbird add-on – You should use TLS for a secure connection
Create/Manage Sieve Filters.
You can either manage these filters using Webmail or using Thunderbird addon.
- Our webmail has a Filters option in the settings – We’d recommend this even if you don’t usually use webmail.
- Extension for Thunderbird (fine for manually editing the script file) (Try the latest version if the released version does not work.)
- There are others, take a look at sieve.info. You’d use the same server, username, and password that you do to access your email and use port 4910, and TLS.
Whatever the IMAPthe email program you use the Sieve filtering will still work. It may be the easiest to create and edit the filters using Roundcube webmail even if you don’t wish to use Roundcube for managing email.
————————————————————————————————————————————————————————————————————————————–
Converting From Mozilla Thunderbird to Sieve
If you use Mozilla (eg Thunderbird) and have existing rules created, then they can be converted into Sieve format on this page: mozilla2sieve.html. Here are some step-by-step instructions on moving the filters over:
- Open your msgFilterRules.dat file in a text editor (notepad, gedit, etc)
- This file will be found in your ‘Local directory’, which can be found in Account Settings – Server Setting – look for the ‘Local directory’ box at the bottom.
- Copy and paste the text into the converter
- Install the ThunderBird ManageSieve Addon:
- Tools – Addons – Search for Sieve, and Install ‘Sieve 0.22’
- If you are unable to manage sieve filters on newer versions of Thunderbird, please install the latest version from here :
https://github.com/thsmi/sieve/blob/master/nightly/0.2.3/sieve-0.2.3e.xpi - Download the file and drag and drop the file on the Thunderbird Addons window.
- Go to Tools – Sieve Message Filters
- Click ‘New…’
- give it a name, eg My Filters
- Paste in the results from the converter page
- Check that there are not any errors reported, then click Save.
- Close the tab with the script, and you’ll be returned to the SieveFilters tab
- Click the little Active button so that it turns into a green tick.
- Close that tab
- Disable the original Thunderbird filters:
- Either by closing Thunderbird and renaming the msgFilterRules.dat to something else (eg msgFilterRules.dat.old) or by unticking all the tick boxes under Tools – Message Filters.
- By default Thunderbird only checks the Inbox for new emails, now that emails will appear in different folders, we need to tell Thunderbird to check each folder:
- Preferences – Advanced – General – Config Editor (be careful!)
- Search for: mail.server.default.check_all_folders_for_new
- Set the Value to True by double-clicking on it
- Close the windows
- You can then view the filters via webmail, which is easier to edit as it’s more of a GUI editor rather than a straight script editor like the Thunderbird addon is.
Note: Not all rules get converted using the above script, some rules might not work such as deleting or moving to local folders within Thunderbird.


