As a feature, our new VPS SSD models provide a snapshot function. Using the menu item „VPS control“ in the customer control panel, you can perform a snapshot of the current status of your VPS SSD at any time. This snapshot can be restored at a later time. Therefore, snapshots are the perfect solution to save the current status of your VPS SSD before performing a bigger update. In case after that update, you should have problems with your VPS SSD, you can restore the previous state with only one click.
To create a snapshot of the current state of your VPS SSD, follow the steps below:
Please login to your customer control panel. Use your e-mail address as the login name and enter your password. Afterwards, click on the "Login" button. You have to take care not to enter any blank spaces, which can also happen by mistake when you enter your password with copy & paste.
If you encounter problems logging in, please use the link "Please click here if you forgot your password or your login" and follow the instructions. For security reasons you can only retrieve a new password using this link, we cannot create a new password for you.
As soon as you have performed the login into your customer control panel, you can create a snapshot of your VPS SSD in the menu item „VPS control“.

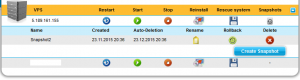
Please press the snapshot button at the right end of the VPS bar. You will receive the following overview:
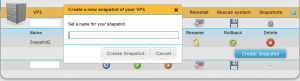
Here you have to press the button „Create Snapshot“. Afterwards, the system will create a snapshot of the current status of your VPS SSD, which has to be named by you.
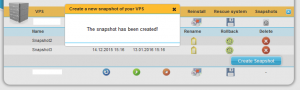
As soon as you have performed the snapshot, you will receive a confirmation.
Under the button „Snapshots“ you will also find a listing of the active snapshots.

As soon as you have created and named the snapshot, you will be able to use the following functions:
„Rename“ → If you want, you can rename the snapshot.
„Rollback“ → Replay the snapshot on your VPS SSD.
„Delete“ → Delete the selected snapshot.
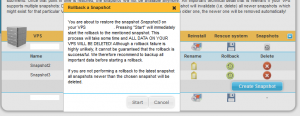
To replay a snapshot, you must select the related snapshot and press the button „Rollback“. Afterwards, a pop-up window will open in which you will be informed about the effects of the rollback. As soon as you click on the „Start“ button, the snapshot will be replayed to your VPS SDD.
At the end, you will get a notification that the snapshot was replayed.
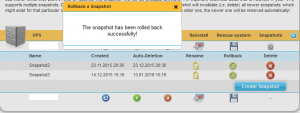
Once you perform a rollback of your snapshots you must be aware, that each older snapshot will automatically delete all more recent snapshots during the rollback. In this case, you will get a warning. As soon as you have performed the rollback, you can use your VPS again in the same state your VPS had been in when the snapshot was performed. Please also, observe that during the rollback all current data and settings on your VPS SSD will be deleted. It is also not possible to roll back only individual data from the snapshot. In any case, the snapshot has to be replayed completely.
Furthermore, you have to be aware of the fact that snapshots will not be stored indefinitely. After 30 days the snapshots will be removed. The exact date for the „Auto-Deletion“ can be found in the customer control panel.
Depending on the VPS SSD model you have chosen, a different number of snapshots which you can store at the same time is available:
VPS S SSD: 1
VPS M SSD: 2
VPS L SSD: 3
VPS XL SSD: 4
Performing a snapshot, you do not have to take care of the disk space usage. The space for the snapshot will not be deducted from the disk space of your VPS SSD but will be stored in additional space.
