We recently introduced the Satellite feed upgrade which allows you to receive transponder signals on your Dedicated Server via the so-called SAT>IP protocol. In this tutorial, we want to show you how to configure the Satellite feed on your Dedicated Server.
After you have received the e-mail containing the IP addresses you are ready to start the setup on your machine.
Important: All IP addresses used in this tutorial are examples! Please use for the configuration of your server only the data provided in the e-mail.
First of all, you need to set up your network configuration.
1. Connect to your server by using RDP
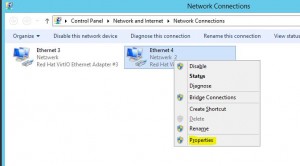
2. Navigate to your network adapters and right-click on the corresponding interface, select "Properties"
Important: The upgrade comes with an additional network interface, do not change your already existing NIC or your server will not be accessible anymore!
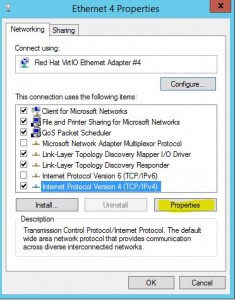
3. Select the TCP/IPv4 protocol and click on "Properties"
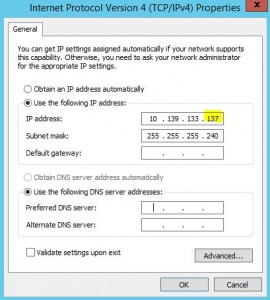
4. Now set up your IP address which was sent to you via e-mail.
In this tutorial, we use 10.139.133.137 as an example.
Your IP address will not be the same as above, please read carefully the information sent to you via e-mail.
5. You need to add a route in Windows, open your Command Prompt as "Administrator" and type the following:
route print -4
The Command Prompt can be started via "Start" -> "Execute" -> "cmd.exe", alternately the "Execute" dialogue can be opened by hitting "Windows-Logo-Key +R"
On top you will see your adapters, you need to check which adapter was just configured for SAT>IP.
In this example the adapter got ID 19, you will probably have another ID - check the descriptions to find the proper ID.
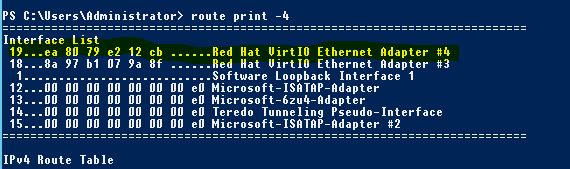
Once you have figured out your ID you are ready to create the route.
route add 10.139.133.0 mask 255.255.255.240 10.139.133.1 if <Your interface ID> -p
e.g.
route add 10.139.133.0 mask 255.255.255.240 10.139.133.1 if 19 -p
6. Check if the connection was set up properly
The IP of the SAT>IP Server was also sent to you in your e-mail, in this guide 10.139.133.2 serves as an example.
Open the Command Prompt and check if the server replies to "ping":
ping -t 10.139.133.2
If the SAT>IP Server does not reply, we will provide some further assistance in setting it up properly, just contact our support team.
7. Install third-party software to take advantage of SAT>IP
The software which is working with SAT>IP can be found here: http://www.satip.info/products/Software
In our tutorial we will use "DVBViewer", but any other SAT>IP-capable software can be used.
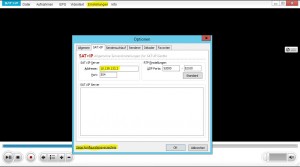
After installing the application navigate to "settings" and enter the IP address of the SAT>IP server.
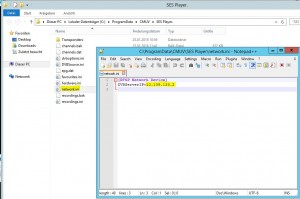
Now click on "Navigate to configuration directory" and edit the network.ini, you need to insert the SAT>IP server's IP address, which was also provided to you in your e-mail:
[RTSP Network Device]
DVBServerIP=10.139.133.2
The setup is finished, save your configuration and restart the application. Now you should be able to watch TV on your Dedicated Server.

